After upgrading T9+ firmware, the miner lacks hash board
Posted: Wed Jul 27, 2022 2:51 am
Antminer T9+ lost 2 hashboards after flashing Dollemizer firmware or building BMminer from source.
Here is the solution:
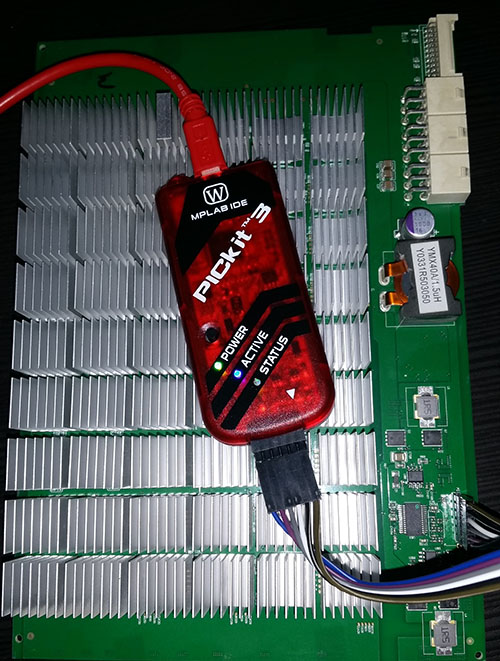
1. Use the programmer to connect the T9+ hash board; pin 1 of the programming cableis in front of the PICKIT arrow;
![Image]()
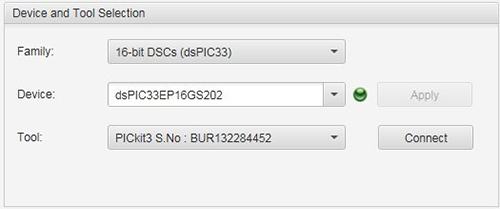
2. Connect MPLAB software;
![Image]()
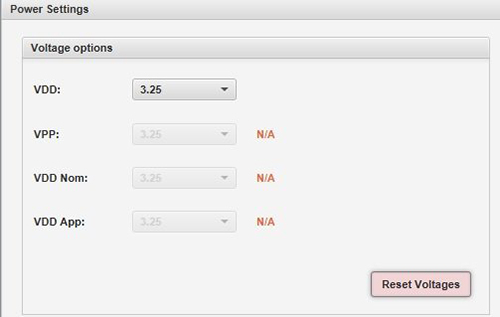
3. Enter advanced mode and get "Power Target Circuit" from the tool;
![Image]()
4. Erase the pic (use if you are sure the hash board is hs);
Code:
Erasing...
Erase successful
2022-07-19 22:14:36 +0200 - Programming...
5. Put the Hex file I extracted from a good board into the Hex file;
Code:
Connecting to MPLAB PICkit 3...
Currently loaded firmware on PICkit 3
Firmware Suite Version.....01.54.00
Firmware type..............dsPIC33E/24E
Programmer to target power is enabled - VDD = 3,250000 volts.
Target device dsPIC33EP16GS202 found.
Device ID Revision = 4003
DEVSN0 = 00000000
DEVSN1 = 00000000
2022-07-19 22:16:21 +0200 - Hex file loaded successfully.
Loading code from C:\Users\pump firmware T9+\Prog PIC\DSPIC33EP16GS202.hex...
6. "Program" and wait!
Code:
Programming...
The following memory area(s) will be programmed:
program memory: start address = 0x0, end address = 0x1dff
Programming/Verify complete
2022-07-19 22:18:13 +0200 - Programming complete
Once the cards flash with PicKit, don't forget to re-flash the miner with the official Bitmain firmware before restarting the miner.
Do it before swiping, or connect the control board (without the hash board) and flash the official firmware, power off the miner, reconnect the hash board, and turn it back on.
Essential is that the first start after flashing the board is done with an official firmware on the miner (with the hash board connected); otherwise, the problem will come back immediately.
Now control board is reprogrammed and working!
Here is the solution:
1. Use the programmer to connect the T9+ hash board; pin 1 of the programming cableis in front of the PICKIT arrow;

2. Connect MPLAB software;

3. Enter advanced mode and get "Power Target Circuit" from the tool;

4. Erase the pic (use if you are sure the hash board is hs);
Code:
Erasing...
Erase successful
2022-07-19 22:14:36 +0200 - Programming...
5. Put the Hex file I extracted from a good board into the Hex file;
Code:
Connecting to MPLAB PICkit 3...
Currently loaded firmware on PICkit 3
Firmware Suite Version.....01.54.00
Firmware type..............dsPIC33E/24E
Programmer to target power is enabled - VDD = 3,250000 volts.
Target device dsPIC33EP16GS202 found.
Device ID Revision = 4003
DEVSN0 = 00000000
DEVSN1 = 00000000
2022-07-19 22:16:21 +0200 - Hex file loaded successfully.
Loading code from C:\Users\pump firmware T9+\Prog PIC\DSPIC33EP16GS202.hex...
6. "Program" and wait!
Code:
Programming...
The following memory area(s) will be programmed:
program memory: start address = 0x0, end address = 0x1dff
Programming/Verify complete
2022-07-19 22:18:13 +0200 - Programming complete
Once the cards flash with PicKit, don't forget to re-flash the miner with the official Bitmain firmware before restarting the miner.
Do it before swiping, or connect the control board (without the hash board) and flash the official firmware, power off the miner, reconnect the hash board, and turn it back on.
Essential is that the first start after flashing the board is done with an official firmware on the miner (with the hash board connected); otherwise, the problem will come back immediately.
Now control board is reprogrammed and working!